Announcement

Collapse
No announcement yet.

Meeker M3: Instruction Thread

Collapse
X
  • Filter
  • Time
  • Show
Clear All
new posts

  • Meeker M3: Instruction Thread

    This is a special Forum Thread made specifically for James Meeker to help with the "Care and Feeding" of his wide body beast of an M3 we called Chainsaw Massacre.


    A track build this extensive needs some serious instructions, and while we made him a binder with wiring schematics, part numbers, and supplied individual instructions for various parts, this should forum post should work better for long term reference (this forum has been up for over 23 years).


    After several track tests in the car, even when James stopped by to pick the M5 up after the 5th track test and last round of work on this car at Vorshlag, he made a list with 13 questions, which I will answer in chunks starting below.

    1. Hood Pins

    Opening the hood and trunk is done with externally accessible AeroCatch lathes. This brand are still the best ways to secure hoods and and trunks without cable operated / OEM style releases - they can be accessed from the outside quickly without tools.


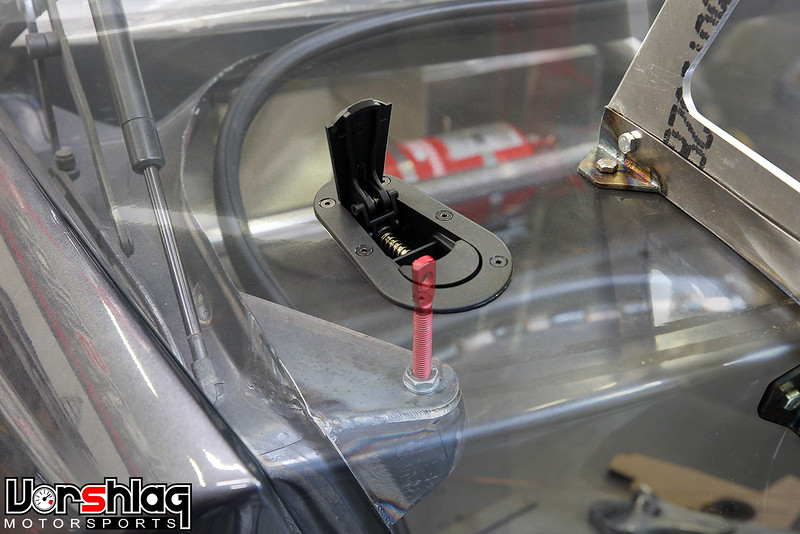
    They have low drag and a very visible engagement when closed - as shown below, you can TELL when they are open, and if they are flat flush they are closed.


    The only issue we ever see is that the retracting latch pin can sometimes get stuck in the bore and will not fully retract fromt he vertical chassis pin tower (the red bit which has a hole in it). It's easy to tell - the spring still looks compressed. If this happens, just shove on the latch at the spot shown below with your finger, it will go "pop" and the pin will retract.


    A little spritz of WD40 on the pin will smooth out the action for a bit. There ya go!

    2. Fire Bottle Pins (and how to use the Fire Suppression Systems)

    Before each event, these two "safety pins" need to be removed from BOTH fire bottles. These pins have to be removed or the suppression systems cannot be triggered. After an event the pins should be replaced, so they are not accidentally discharged.


    The fire suppression bottle that is behind the back seat (see above) is in the forward part of the trunk. It is easier to access the pin from the trunk side, however.


    Brad built this special access panel to be able to remove / replace the pin. This panel should remain closed when driving, but it can be opened without tools.


    There is a hinge at the bottom and a single "quarter turn" butterfly handle Dzus fastener at the top. Turn that butterfly, the panel can swing down, and the pin is visible.


    The secondary fire suppression bottle is behind the passenger seat. You can just reach back from the front drivers seat and remove / replace the pin for that easily. The pins are pulled with what looks like a round key ring and can dangle from the plastic loop until they are reinstalled.


    Remember, this car has a primary fire system for the engine bay and a secondary fire system for the passenger cabin and fuel cell. We figured it was well worth the extra $500 in fire system parts to run two, considering what was invested in this build. The "fire pulls" are the two red T-handles at the top of the center dash area (see below), with secondary pulls for both bottles located outside of the car at the A-pillar.


    If you ever suspect fire immediately shut down the engine (hit the Cartek button - I will show that below) and get off the racing line (but don't go in the grass if it is dry - that can burn from contact with a hot exhaust). Once at a controlled stop GET OUT OF THE CAR. If you have time while slowing down, before the car has stopped PULL THE FIRE SYSTEMS. If in doubt, pull them both.


    Car fires are luckily a VERY RARE thing to encounter, but still - nothing is more potentially dangerous while driving on track than fire. A car fire can happen in anything - even a normal street car. The general rule is: The more modified a car, the higher the risk. We regularly put a full fire suppression system in even a streetcar, nowadays.


    Luckily James be driving the M3 with a proper fire suit, gloves, helmet and shoes + TWO fire suppression systems, so he is way ahead of the game. Yes, its worth the 40 pounds and other costs. In the five previous track outings every single driver and passenger has been properly outfitted in fire suits and gear.


    Getting YOU and our passenger out is THE most important part. Release harness, yank the steering wheel off and set it aside, open the door and climb out FAST. You should practice this belted in with all of your gear on - the goal is 15 seconds or less. If you have to hit the external fire pulls and Cartek kill AFTER you have exited the car. Saving the equipment is secondary to saving YOU.

    continued below...
    Last edited by Fair!; 01-13-2023, 06:22 PM.
    Terry Fair - www.vorshlag.com
    2018 GT / S550 Dev + 2013 FR-S / 86 Dev + 2011 GT / S197 Dev + C4 Corvette Dev
    EVO X Dev + 2007 Z06 / C6 Dev + BMW E46 Dev + C5 Corvette Dev

  • #2
    3. Start-up Procedure / Switches

    This car has a lot of main and secondary systems and ends up with a lot of buttons, dials, switches and digital readouts. This section will explain the proper order for starting the M3 before going out on track.


    Starting the car is fairly easy. Step 1 is if the main power is off, press the Cartek battery reset in the center stack. If the red LED in the center is not illuminated, the battery is shut off. When it is lit red, lots of things turn on, including the fuel pump and AiM dash. Step 2 flip the toggle switch labeled "Ignition to the up position (flipping this down is the easy way to shut the engine off but leave everything else in the car powered on). Step 3 is to press the push button start.


    There is also a brake bias knob at the top of the center stack, which ties to a cable that can shift braking force between on the front and rear brake master cylinders (Tilton units). Adjusting that knob pushes the cable which shifts the bias bar right behind the brake pedal (see above right). That should be left alone - it is set properly now and would take extensive track / measured brake testing to improve. We marked that before the car left where it should stay. The Mk60 ABS system also does a lot of this front/rear bias adjustment dynamically, with ABS application.


    The rest of the switches and knobs are well marked in the pair of center stack panels. The radiator fans will come on automatically but you can force them on (if say you are between sessions and want to cool off the water in the radiator with the engine off) by flipping that up. The EPAS steering assist can be adjusted up or down, but where it is in the "middle" setting on the dial should work all the time. Traction control set to "4" is a good starting point, and a lower number is MORE sensitivity (and more control by the Motec).


    There is also a turn key switch on the center console that can be switched on or off, and even removed. We had added this early in the build when we were talking about Optima Street Car events, for security. Just leave that switched like it is and control the power and ignition with the Cartek and Ignition switches on the center stack. There is a 12V power socket on that panel, and the CoolShirt flow controller, but we will cover that in another section.


    The differential fluid cooler should be turned on for track sessions longer than 5 minutes. This switch (labeled on the lower center stack panel) turns on both the diff cooler pump and fans - circulating the fluid from the differential housing, through the heat exchanger cooler, and back. Once you are done driving you can turn it off, or just shut all power off at the Cartek battery kill switch.


    There are four momentary buttons on the steering wheel controls. The two upper Orange buttons are left and right indicators (turn signals). The Red button is for resetting an alarm on the AiM dash and the Blue button is for scrolling to another AiM dash screen. These are wired into the chassis with a 12-pin DW connector that can be disconnected if needed, but it should have enough length to allow the steering wheel to be placed on the hook, at the top of the front roll cage tube.

    4. Consumables & Fluids

    One of the questions on every build is - what parts and supplies will I need to replace and where do I source them?


    The Ford 8.8" rear diff housing has a rather large cooler, pump and fans and combined these hold 4 quarts of 75W140 gear oil.This fluid should be changed once per season with synthetic 75W140 fluid.


    The rear differential housing gears are 3.73 Ford Performance parts and has a Wavetrac differential unit that should not need service for a while to come.


    The fuel cell can was custom built in house, the FIA bladder inside was custom built Harmon Racing Cells and holds 16 gallons of fuel. The engine was tuned for 93 octane pump gas and that is what should be utilized for the near future. The M3 will likely use 5-10 gallons of fuel per 15-25 minute session, so filling the 5 gallon fuel jugs we sourced for you should be a forethought before every event day. The fuel is added via the fuel filler door


    The clutch and flywheel setup is a McLeod Racing Mag Force ceramic face twin disc clutch kit model #651052-00-07M and the throw out bearing and slave is a GM model


    The engine oil filer is mounted under the front frame rail, ahead of the right front wheel. This Wix 51060XP filter should be replaced at each oil change. These are not always stocked in auto parts stores but an O'Reilys Auto Parts can order them, or you can find them on Amazon. This is also listed in your maintenance manual.


    The engine oil we have used for this HPR built 468" LS7 engine is Motul 5W50 Sport Ester. This is stored in the ARE dry sump oil tank, which is under a protective aluminum enclosure behind the passenger seat. A typical oil change will require 2.5 gallons of oil, but if you have the oil coolers flushed it might need as many of 3 gallons. More on this at the "checking the oil level" section below.


    The fuel filter is located back behind the fuel cell, underneath the back seat. This uses an Injector Dynamics ID F750 Fuel Filter assembly, and the filter element should be replaced annually. The replacement filter element can be found here.


    The hydraulic fluid used in the brake and clutch systems is Motul RBF600, which is all housed in the remote mounted Tilton reservoir within the cabin. The brakes should be flushed and/or bled whenever the pedal feels soft or when the fluid looks dark.


    The Spark plugs utilized are NGK TR6 part number 4117 and should be inspected periodically and changed when needed.


    The two air filters are K&N model 33‑2493 but they should be "lifetime" filters. These should be removed / cleaned / re-oiled annually, or as needed.


    The wheels are 18x13" Forgestar M4 2-piece wheels with the same offset and width front and back. Should you need additional wheel sets they should be built with a 6.7" backspacing. Tires are Hoosier R7 compounds with 335/30R18 front and 345/35R18 rear, which can be sourced from TireRack or other sources.


    The tires can and will lose some air pressure after sitting for some time - that's normal. Tire pressure is critical and must be checked before the first session of a day and after you come in, while the tires are still hot. Normally these big Hoosiers like to see 26 psi cold and 30-34 psi hot - the hot pressure is most important. After you "bleed the tires down" after your first session of a day, check them at least after the next session. As the day / track warms up, tire pressures will climb.

    The lug nuts need to be torqued to 85-90 ft lbs, but not while hot. If you change wheels for any reason, make sure they are torqued properly. The lug nuts should be replaced every 1-2 years, but this is a low cost item. We stock these M12-1.5 lug nuts and they use a 17mm socket for changing (we helped you source the proper sockets and cordless impact).


    The front lower control arms and bushings are from SLR Speed and any replacement bushings (if needed) can be sourced from their company.

    Adding Fuel & Checking the Oil Level

    These are likely the only things you will do to the M3 during a race weekend, as everything else can be handled by Esses Racing.


    Checking the oil level in the dry sump tank should be done before the first track session every day, and it wouldn't hurt to check it after each session as well. This is done from the "tool booth" window behing the driver. Slide that open, remove the triangular cover for the oil tank enclosure by turning the 4 butterfly Dzus fasteners (no tool needed), and remove this cover. Under that is the ARE oil tank and screw on cap. Remove the cap.


    Now place the dipstick into the tank and make the right angled portion tough the top of the filler neck. Pull it out and check the oil level. The dipstick provided from ARE (bottom in image above) is too short and allows too much oil to be filled at their recommended setting. ARE's information about their tanks is simply wrong - and the industry knows this (we eventually figured this out, too). We made another dip stick (top one in image above) and marked it with notches, and found the correct level in the 5 track outings we made in the M3. Reference this picture and the black painted line on the preferred mark. DO NOT OVER FILL.


    Adding fuel is easy. The small ATL branded filler cap is easy to remove in the right rear window. Next use the fuel jugs provided and pour in the fuel as needed. Again, the car will use between 5-10 gallons per 15-25 minute session, maybe more as you get faster. There is no fuel level gauge built into the fuel cell.

    continued below...
    Terry Fair - www.vorshlag.com
    2018 GT / S550 Dev + 2013 FR-S / 86 Dev + 2011 GT / S197 Dev + C4 Corvette Dev
    EVO X Dev + 2007 Z06 / C6 Dev + BMW E46 Dev + C5 Corvette Dev

    Comment


    • #3
      Brake Consumables

      The brakes on the E46 are Powerbrake racing brakes. info@powerbrake.us +1-704-804-2438

      Powerbrake X-Line X6EL 6-piston 350x34mm FRONT race brake kit
      Kit part#: BMW04F.BCH.BKD3.A (BMW E46 M3)

      Powerbrake X-Line X4EM 4-piston 345x28mm REAR race brake kit
      Kit part#: BMW04R.AXH.BJA3.A (BMW E46 M3)

      Pads we selected are
      Front X6EL-PB29
      Rear X4EM-PB11

      The first part of the number is the size or shape, the second is the compound.
      If you want to order pads from another supplier, they cross over.
      The FMSI numbers are the generic name for the pad shape.

      X6EL = FMSI D1116 and 18mm thick
      X4EM = FMSI D810 or D968 and 18mm thick

      Front rotor rings, drive bobbins, bobbin cups and hats are available from Powerbrake.

      Rotor rings come with new bolts, washers, x-float wave springs and drive bobbins.
      Front RS350X34L/R
      Rear RS345X28L/R


      Information on the Powerbrake Pad Compounds

      Powerbrake PB05 - Crossover Street / Light Track / Light Car Race

      - Optimum heat range: 0-1300 deg F (0-700 deg C)
      - Friction co-efficient: 0,52
      - Recommended tires: High-performance street, Ultra high-performance street or All Terrain
      - Pad life: Very good
      - Disc wear: Low
      - Brake dust: Low - medium
      - Suitable for street use: Yes
      - Suitable for off-road 4x4 use: Yes
      - Suitable for track day use: Yes (entry-level)

      Powerbrake PB05 is a ceramic-carbon-metal compound designed to deliver strong stopping power,
      extreme fade resistance and very good pad life as well as low noise, low dust output and low disc
      abrasion. The PB05 compound offers the very highest level of performance and fade resistance that is
      available on the world market before moving into true race pad compounds, which can run noisy when
      used on street cars. PB05 has a positive but not overly aggressive initial bite. It is specifically engineered
      to reduce the occurrence of premature wheel lockup and unwanted ABS intervention when running
      street or all terrain tires. The PB05 compound has an optimal temperature range of 0-1300 deg F (0-700
      deg C), which makes it ideal for use on cars that are used for both high-performance street as well as
      entry-level track day use (i.e. less than 7 laps per session with a standard car running on street tires).
      Brake response and modulation is excellent, even at speeds in excess of 130mph (200km/h). Pad wear
      life is good in this dual-purpose role and PB05 is particularly kind to discs as well. Drivers of fast / heavy /
      powerful (high-inertia) cars will find the PB05 material to be an excellent choice for high-performance
      street use. The compound exhibits very low compressibility resulting in a very good pedal feel. For the
      friction mounting, in addition to the bonding agents used to attached the friction material to the pad
      backing plate, the backing plates used in the manufacture of PB05 pads, have a mechanical system
      which grips the friction material puck, this greatly increases pad shear strength and practically
      eliminates the chance of pad de-lamination at high-operating temperatures. Edge-chafers are also
      standard on all PB05 pads to ensure the quietest possible operation. Suitable for use on a wide range of
      high-performance street cars, SUV's and 4x4 vehicles. This is the very best dual-purpose street / light track
      pad currently available on the market in our opinion. While these pads can certainly be used with
      standard factory (original equipment) brake discs, we highly recommend running them in conjunction
      with our Powerbrake GT or All Terrain Series high-performance slotted brake discs for maximum brake
      performance, fade resistance and wear life.

      Powerbrake PB11 - Crossover Street / Light Track & Race - also Rear Applications

      PB11 was developed from the PB13 base compound for sprint race and rally applications ? also this is
      used for many rear brake applications in order to balance the car. The material offers an average friction
      co-efficient. The PB11 compound exhibits a flat predictable torque curve for optimum modulation. The
      compound offers a very good pedal feel with good initial bite. It will suite drivers that prefer to use
      relatively high pedal pressures while maintaining good control and modulation. This compound has a
      good heat range with brake performance and pedal feel remaining superb even at disc temps of 1000-
      1300 deg F (550-700 deg C). The material works from cold and reaches its optimum working
      temperature after just a few brake applications. A good choice for light to medium weight race cars that
      run OE brake boosters. Can be used for fast-road or track use, although some brake squeal may be
      experienced under street driving conditions.

      Powerbrake PB13 - Extreme Road / Track / Race

      Possibly the most versatile race compound in the Powerbrake range, PB13 was originally developed for
      BTCC Super Touring Cars in early 2000?s but its characteristics make it an ideal choice for a wide range of
      sprint race and rally applications. PB13 is currently Powerbrake's top selling sprint race compound for
      production-based race cars. It is also often our first starting recommendation for rally with short stage
      applications. It offers a positive initial bite, friction co-efficient and heat range - pedal feel, modulation
      and consistency are excellent even at temperatures in excess of 1200 deg F (650 deg C). Pad wear life is
      reasonable and the material also exhibits very low disc wear. PB13 can be used without a brake booster
      depending on driver preference. The material remains very consistent in both wet and dry conditions.
      Used in Bridgestone Production Cars, VW Challenge A-Class, Silver Cup, Super Saloons, Modified
      Production Cars, Super Hatch, BTCC, WTCC, PWC, International Rally, etc. Can be used for fast-road or
      track use, although some brake squeal may be experienced under street driving conditions.

      Powerbrake PB23 - Race

      The PB23 compound is designed for race applications where very high sustained brake temperatures in
      excess of 930 ? 1020 deg F (500 - 550 deg C) are experienced. The PB23 compound offers positive initial
      bite and good friction levels with fade resistance and a sensible wear rate and pedal feel remains
      positive at extreme brake temperatures. If your application results in sustained high temperature use
      then PB23 will be a good choice. Used in GT, Touring Car, Production Car and Rally applications in cases
      where extreme brake temperatures are expected, also used successfully in certain endurance race series
      like AER.

      Powerbrake PB24 - Race

      PB24 is a new generation compound developed for sprint racing applications where high brake
      temperatures are reached. The PB24 compound offers positive initial bite, good friction levels with fade
      resistance and a sensible wear rate. This compound will start working at around 392 deg F (200 deg C).
      In addition to this, PB24 offers the best modulation characteristics of the entire Powerbrake sprint
      compound range. The latest technology, a high-level production process and materials are used to
      manufacture PB24 pads, Powerbrake is of the opinion that this product is currently the leading all-round
      race compound on the world market in terms of performance, wear rate and fade resistance. Used in
      high level race applications by works race teams; Rally Raid, GT Challenge series, production car series
      and numerous circuit race applications around the world.

      Powerbrake PB25 - Race

      The PB25 race compound is designed specifically for mid to heavyweight cars that see extreme brake
      temperatures, brake loads and wear. The PB25 compound offers a strong bite and high sustained
      friction levels, with good wear life and fade resistance. Modulation remains good in spite of the
      extremely high friction levels. Starts at a lower temperature range 392 deg F (200 deg C). This compound
      is also kind to rotors and is used successfully on heavy GT cars and Production Race Cars. Recommended
      for cars with very high levels of grip

      Powerbrake PB29 - Race

      The PB29 race compound is the latest generation of race pad formulation, launched in 2016. Using the
      latest manufacturing technology, it offers unmatched fade resistance and class leading high
      temperature stability. Suitable for powerful, heavy race cars and high inertia applications. This
      compound offers mid-level friction, the pad temperature needs to be at around 1166 deg F (500 deg C)
      to begin working and it has good wear life. A Powerbrake favorite for extremely heavy, high
      temperature applications on sprint race vehicles.
      Last edited by modernbeat; 02-07-2023, 10:17 AM.

      Comment

      Working...
      X