 Tweet
Tweet
So you watched a race recently and think you think you need a rear diffuser. First of all, unless you ALREADY have a MASSIVE front aero package AND a MASSIVE rear wing, you don't "need" a diffuser...

Why do we say this? Because the "need" for a rear diffuser is always in question. You can almost always make more rear downforce with a good rear wing than you can with a front splitter, on a normal sedan shaped car (below). Do you have a multi-element wing yet? How about mounting the main wing plane above the roof... by at least 8 inches? If not, do this things FIRST (if your class rules allow).

The lack of front aero options on "normal sedans" makes it nearly impossible to match front downforce of a rear wing out back to achieve "aero balance". What we don't want is too much aero downforce at one end of the car, which makes the handling in high speed corners go out of whack. Again, this applies to a sedan shaped car, where we virtually NEVER see a front wing used.


But some series don't allow a wing, or restrict wings so hard that a diffuser can still be of help. OPTIMA series is one such place. A diffuser also doesn't suffer from drag as much as a wing, so it has less downside. But it is also a lot less effective as a wing.

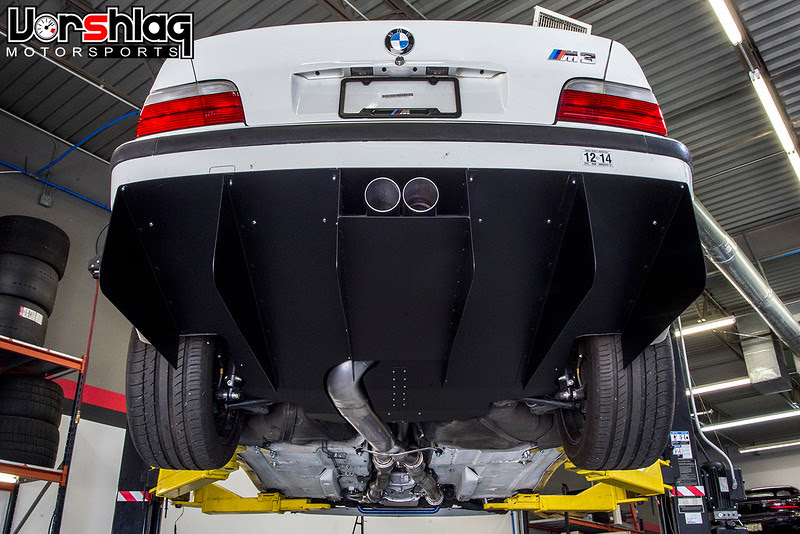
Ideally you will feed an aggressive diffuser design with a flat bottom undertray, as shown above. You can even blow the exhaust into the front of the diffuser box, but this isn't exactly F1. Making a carbon diffuser is hideously expensive, so we recommend aluminum designs, as shown below.


Looking at other diffuser designs is a great way to get ideas - but be careful of what series and classes of cars you are using for examples. "Unlimited" NASA ST/TT classes allow a LOT of wacky designs (see above) as do World Time Attack cars (below).


The two WTA cars above have MASSIVE duct box volumes and diffuser angles that are beyond 7°, but many of those cars are VERY custom built and some even have F1 aero engineers pushing their designs. Again, that series has almost unlimited aero rules, unlike most US base road racing and time attack series.


Making an effective diffuser is a bit of a chore (we have spent as much as 50 hours making a good looking, strong, aluminum diffuser), and there are no hard and fast rules. Conflicting articles online say that a diffuser angle of 5-7? is all you can use before stall, then others state up to 13? works. The real answer? "It Depends". However you make it, and for whatever reasons, here are a few examples of aluminum sheet diffusers we have built, and links to their construction, for reference:
VORSHLAG DIFFUSER EXAMPLES
This was an example we built for a BMW E36. These cars do not have a "flat bottom" but we lined up the diffuser plane with the "most flat" sections of the floor, and took it as far forward as we could. This is an elaborate assembly with a panel covering the single, center exit exhaust we built for use with this diffuser design. This one extends far behind the car and the spare tire well was cut out to make room for this diffuser.
More construction pics: https://vorshlag.smugmug.com/Vorshla...-LS1/i-pNc9QqX
This is the design we made for a '69 Camaro, which had a full flat bottom floor and dual element front splitter, ducted hood, and giant rear wing. As subdued as this looked it is likely more effective than the outrageous design on the BMW above - because it is fed from a flat floor that totally encompasses the car. We were able to pull this off because this has a custom tube chassis that had "flat bottom" by design. The fuel cell was mounted just above the diffuser and the dual exhaust blows into the leading edge as well.
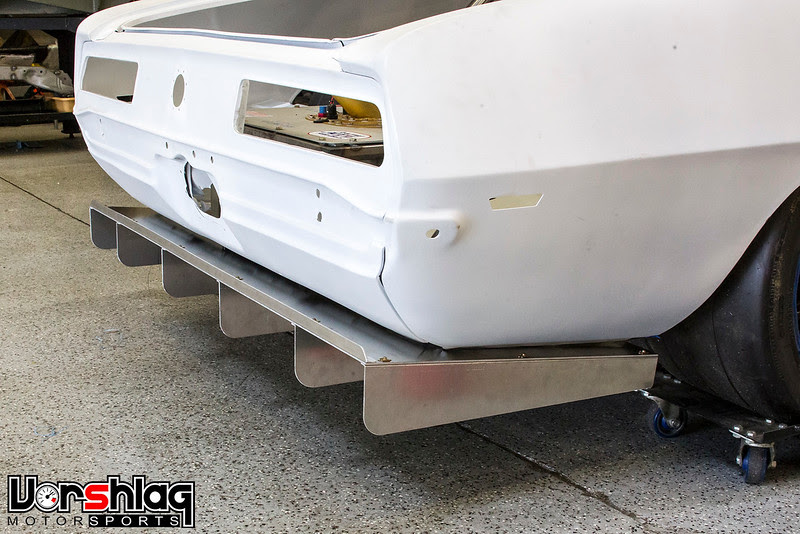
More construction pics: https://vorshlag.smugmug.com/Project...ring/i-zC4BK5f
Last but not least is this outrageous diffuser on a wide body BMW E46. This car is pretty over the top with 335 mm front / 345 mm rear tires, wide body, MASSIVE front splitter/ducted hood, and a large AJ Hartman 14" chord x 72" wide rear wing. We extended this diffuser box behind the car and cut out the spare tire well to gain room.

More construction pics: https://vorshlag.smugmug.com/Project...-LSx/i-8BKB7PC
Don't forget to click on the links above for more of our construction pics, and this gallery has some more examples as well.
Some tips:
1. if you do make one out of aluminum sheet like these above, assemble the tunnels to the main plane via bolts or rivets. DO NOT weld them on (we threw away one we did this way).
2. Use 3003 sheet, not 6061. Thickness of .080" works best.
3. Find someone with a shear and box break to borrow
4. Leave a rounded edge on the lower trailing corners - sharp edges will dig into the ground backing up, or worse - your legs if you walk too close.
5. The longer you can extend the diffuser box behind the car, the better. Check class rules for limits
6. The lower you can run the vertical "strakes" to the ground, the more effective the diffuser will be. Again, check rules, and realize that loading into a trailer can be trickier. Longer loading ramps help!
7. Leave it raw aluminum, but if you want color - powder coat it, like the black one at the top.
8. If you are allowed in your class, cut the rear bumper cover up as high as possible to allow for more "diffuser box". If you can relocate the exhaust and remove the spare tire well, do it!
9. Always remove the diffuser for any dyno testing or road use!
10. Diffusers work better with a flat bottom undertray feeding into it, but again, check class legality.
Good luck!
Terry @ Vorshlag
Why do we say this? Because the "need" for a rear diffuser is always in question. You can almost always make more rear downforce with a good rear wing than you can with a front splitter, on a normal sedan shaped car (below). Do you have a multi-element wing yet? How about mounting the main wing plane above the roof... by at least 8 inches? If not, do this things FIRST (if your class rules allow).
The lack of front aero options on "normal sedans" makes it nearly impossible to match front downforce of a rear wing out back to achieve "aero balance". What we don't want is too much aero downforce at one end of the car, which makes the handling in high speed corners go out of whack. Again, this applies to a sedan shaped car, where we virtually NEVER see a front wing used.


But some series don't allow a wing, or restrict wings so hard that a diffuser can still be of help. OPTIMA series is one such place. A diffuser also doesn't suffer from drag as much as a wing, so it has less downside. But it is also a lot less effective as a wing.
Ideally you will feed an aggressive diffuser design with a flat bottom undertray, as shown above. You can even blow the exhaust into the front of the diffuser box, but this isn't exactly F1. Making a carbon diffuser is hideously expensive, so we recommend aluminum designs, as shown below.


Looking at other diffuser designs is a great way to get ideas - but be careful of what series and classes of cars you are using for examples. "Unlimited" NASA ST/TT classes allow a LOT of wacky designs (see above) as do World Time Attack cars (below).


The two WTA cars above have MASSIVE duct box volumes and diffuser angles that are beyond 7°, but many of those cars are VERY custom built and some even have F1 aero engineers pushing their designs. Again, that series has almost unlimited aero rules, unlike most US base road racing and time attack series.


Making an effective diffuser is a bit of a chore (we have spent as much as 50 hours making a good looking, strong, aluminum diffuser), and there are no hard and fast rules. Conflicting articles online say that a diffuser angle of 5-7? is all you can use before stall, then others state up to 13? works. The real answer? "It Depends". However you make it, and for whatever reasons, here are a few examples of aluminum sheet diffusers we have built, and links to their construction, for reference:
VORSHLAG DIFFUSER EXAMPLES
This was an example we built for a BMW E36. These cars do not have a "flat bottom" but we lined up the diffuser plane with the "most flat" sections of the floor, and took it as far forward as we could. This is an elaborate assembly with a panel covering the single, center exit exhaust we built for use with this diffuser design. This one extends far behind the car and the spare tire well was cut out to make room for this diffuser.
More construction pics: https://vorshlag.smugmug.com/Vorshla...-LS1/i-pNc9QqX
This is the design we made for a '69 Camaro, which had a full flat bottom floor and dual element front splitter, ducted hood, and giant rear wing. As subdued as this looked it is likely more effective than the outrageous design on the BMW above - because it is fed from a flat floor that totally encompasses the car. We were able to pull this off because this has a custom tube chassis that had "flat bottom" by design. The fuel cell was mounted just above the diffuser and the dual exhaust blows into the leading edge as well.
More construction pics: https://vorshlag.smugmug.com/Project...ring/i-zC4BK5f
Last but not least is this outrageous diffuser on a wide body BMW E46. This car is pretty over the top with 335 mm front / 345 mm rear tires, wide body, MASSIVE front splitter/ducted hood, and a large AJ Hartman 14" chord x 72" wide rear wing. We extended this diffuser box behind the car and cut out the spare tire well to gain room.
More construction pics: https://vorshlag.smugmug.com/Project...-LSx/i-8BKB7PC
Don't forget to click on the links above for more of our construction pics, and this gallery has some more examples as well.
Some tips:
1. if you do make one out of aluminum sheet like these above, assemble the tunnels to the main plane via bolts or rivets. DO NOT weld them on (we threw away one we did this way).
2. Use 3003 sheet, not 6061. Thickness of .080" works best.
3. Find someone with a shear and box break to borrow
4. Leave a rounded edge on the lower trailing corners - sharp edges will dig into the ground backing up, or worse - your legs if you walk too close.
5. The longer you can extend the diffuser box behind the car, the better. Check class rules for limits
6. The lower you can run the vertical "strakes" to the ground, the more effective the diffuser will be. Again, check rules, and realize that loading into a trailer can be trickier. Longer loading ramps help!
7. Leave it raw aluminum, but if you want color - powder coat it, like the black one at the top.
8. If you are allowed in your class, cut the rear bumper cover up as high as possible to allow for more "diffuser box". If you can relocate the exhaust and remove the spare tire well, do it!
9. Always remove the diffuser for any dyno testing or road use!
10. Diffusers work better with a flat bottom undertray feeding into it, but again, check class legality.
Good luck!
Terry @ Vorshlag